Wednesday, December 8, 2010

Measure twice, cut once

Such a simple idea, but I'll never learn.  After spending the better part of the day butchering turkeys for the spoiled rotten dog who doesn't even live here anymore, and dealing - finally - with this...


which has been piling up for a month (which I know because there were two months utilities bills in there), I finally sat down at 7:30 pm to finalize my plan for the headboard.  I've been agonizing over the details of the design - and how that will impact the execution - for days now, but I finally at least decided that regardless of how I intend to treat the face, I want the general structure to be the same as the one shown in this absolutely fantastic series of videos on youtube...


Before I had my eureka moment where I decided to pull the bed away from the wall so that I could center it and do flanking window treatments, I had intended to simply upholster a piece of plywood and attach it to the wall.  But now that the bed will be several inches away from the wall, that obviously won't work - it will have to have legs and be bolted to the bed frame.  The video series (there are eight episodes in all) cover everything you need to know except how to upholster around the legs if you're not intending to do the shirred border they use which, coincidentally, is exactly the same width as the 2x4 leg.   I had also originally intended to do simple diamond tufting, but scrapped that idea a couple of weeks ago when it became obvious that the room is already quite feminine enough.  Instead, I decided to do channel tufting because it would echo a pretty common art deco design...


So, great - that would give me a way to force a 3-1/2" edge in there, but, I really, really, reeeeeeeeally don't want to do channels every 3-1/2" all the way across the headboard.  It would be too busy, and it would be a PITA!  So I played around and played around with variations of 3-1/2" channels and 7" channels and combinations of the two and finally just decided I'm overthinking it.  I (think) I will (probably) just do 7" channels and when I get to the part where I have to upholster around the legs I'll wing it!  

Having this "decided," I headed out to the garage to start cutting the lumber.  I already had the headboard itself cut out, so I figured it would take me fifteen minutes to cut the 2x4's to the correct lengths and then I could get the sucker glued and screwed together and go to town.

And then I cut my longest 2x4 WRONG.  And did not have enough lumber to make it up.  And Home Depot was closed by this point, of course.  So here I sit, having once again screwed myself because I'm always so damned scatterbrained.  This isn't the first time I've cut WRONG.  I do it with lumber, I do it with fabric, I do it with anything you can think of that can be cut.  And every time it happens, it's because I'm not fully "present in the moment."  I'm always thinking about what I can do after I finish the current task, and sometimes what comes after that, and after that, and after that.  It's a sickness, I tell you, and I wish they'd make a pill for it!  

Manana!

Tuesday, December 7, 2010

No more fish bowl!

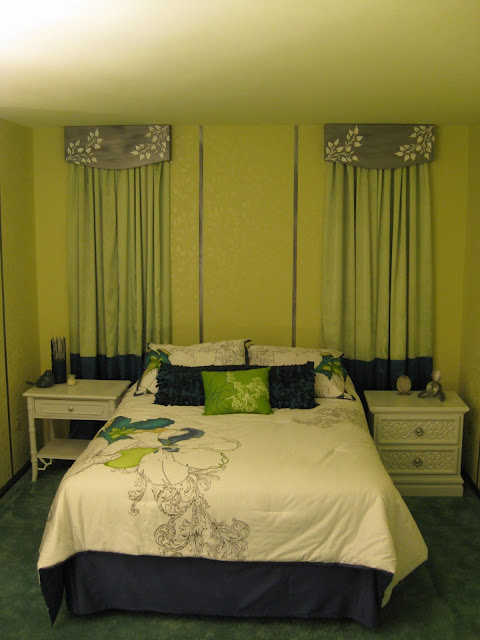
My sister is going to pounce on me for this, saying "OMG, you sound just like mom," but I really do hate uncovered windows at night.  It's one of mother's (many, many, many) pet peeves and you can be sure she'll comment if she's around and you don't get the curtains closed promptly at twilight that "I feel like I'm living in a fish bowl!  Anyone and everyone can stare in here!"   My issue with uncovered windows has nothing to do with privacy, however; I just think a big, black expanse of glass is cold and unwelcoming.  This is soooooo much better...

bedroom with two-toned curtain and dimensional stenciled cornice

Woot!

bedroom with two-toned curtains and dimensional stenciled cornice

a little-bit-closer Woot!


and an other-end-of-the-room Woot! 

I am so, so, soooooo glad to have this part of the re-do out of the way.  I really don't enjoy sewing; I do it only because I can so rarely find what I want in the colors I want.  In the case of these curtains, I also saved a bundle because the fabric was dirt cheap ($2.99/yd), but that's really not usually the case these days.  For instance, I made my daughter a computer satchel and laptop case for her birthday this year and spent a hundred bucks for the fabric and pattern.  Ridiculous!

If you've been reading from the beginning, you may recall I was very nervous about how much trouble my cheap-o polyester satin was going to give me, but because I used broadcloth for the lining I didn't really have any issues with the slip-sliding and instability I was expecting.  It wasn't even necessary to use the spray starch my sister suggested, though I did use it after they were completed to give them a bit more body and the #$@##%#%! stuff left stains all over the fabric which I'm just trying to ignore for now.  (They're very faint, but once I hang the lights in front of the two flanking the bed it may become a bigger issue.)  

In the last photo above, you can see the corner of my eyesore-of-a-chair hidden under a couple of throws I picked up.  The green one isn't really the right shade of green, so I'll probably end up using it in my family room.  The other one is the P.E.R.F.E.C.T. shade of aquamarine, and has a really pretty brocade look that you can't see very well in the picture.  And it was a steal at ten bucks.  But.  Sigh.  It sheds like crazy and the fluff that comes off of it glues itself to anything it touches verrrrrrrrrry securely, so I'm going to run it through the dryer with a wet towel a couple of times and if it doesn't stop it's going back.  Darn it.  

Oh, and in the other photos you may notice I've been busy shopping for fun stuff to set about.  No?  Well then, here...


The little frame is a Hobby Lobby find that I'd like to use for a silhouette of my daughter; the clock I found online and had my Dad order (oh, CRAP!  I keep forgetting to send him a check!) because he has a clock shop and I wanted his discount.   On the other side of the bed...

decorative accents

are a couple more Hobby Lobby finds.  I thought the bird was apropos because of the trees, and I just thought that candle holder was fantabulous (and a measly five bucks at half price).   They'll both probably be moved over the the dresser when I get it painted (Thursday, if the weatherman isn't lying to me about the 60 degree temps).  

Back to the topic of sewing for a moment:  A couple of years ago, a guy on one of the decorative painting forums I occasionally pop into was lamenting that while people think nothing of spending thousands of dollars on custom window treatments, they balk at spending the same amount for, say, a decorative paint treatment that will grace all of the walls in that same room.  I really wanted to give him a piece of my mind, because he obviously has no bloody idea how time-consuming sewing is.  For instance, I spent three times as long on the sewing for a recent job as I did on the painting, but charged three times less because that's what I felt the market would bear (based on how much it would cost her to go out and purchase similar items ready-made).   

Next up:  The Headboard!  I probably won't have it finished until Wednesday, but will post whatever progress I make on it...

Manana!  

(BTW, I love the word "manana" ever since a Mexican guy told me "It doesn't mean "tomorrow morning;" it means "Not now."    And it's so much catchier than "Uh, whenever!")

Wednesday, December 1, 2010

Building a cornice

This one's going to be short, sweet, and relatively boring, folks!

I realized pretty quickly after pulling out the plywood I had leftover from another project that it was just not going to work for my cornices.  It's just much, much too rough on both sides, and with the added problem of the edges showing (and therefore needing some sort of "hiding" fix since you can see the plies), I finally convinced the miser in me to just make life easier and buy the right thing for the job.

While I was at Home Depot picking up the cornice board wood, I also purchased the plywood for the headboard.  Wow, did I luck out on that one!  They had a couple of pallet loads of  "special purchase"11/32x4x8 A/C plywood for only $25!  (I was expecting to shell out around $40.)   Oh, and puh-lease, lumber guys, what's this 11/32 crap?!?   I stood there looking at that number and trying to figure out what normal number  it would approximate,  then gave up on doing the math in my head and took out my handy tape measure (that I go nowhere without) and it measured 3/4" (which, btw, is much larger than 11/32).  Why can't they just call lumber by its actual measurements?

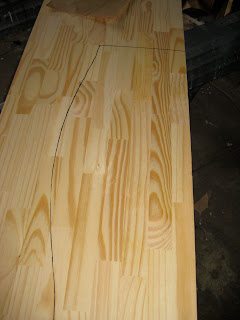
We left off yesterday with my paper cut-outs, so the next step is to use that to trace the shape onto the wood...

DIY cornice

then grab your jig saw and cut it out.


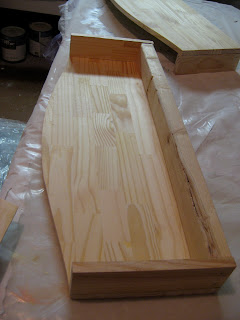
I didn't want or need these cornices to be very deep, as the curtains are going to be lightweight and the rod and rings just your average, cafe rod size, so I used a 2"x3" along the top of each cornice and finished out the sides with pieces cut from the same material as the face...

DIY cornice

It's all glued and nailed together snugly, and I really do have all of them built...

DIY cornice

...and I was so excited to get them primed and base-coated, but the @#$!#$!@ wood putty I used to fill the nail holes needs 24 hours to dry if you're using anything but latex paint.  I always use B-I-N primer, which is white pigmented shellac, for...practically everything.   Fun fact:  Did you know shellac is made from bugs?  The lac bug, to be precise!   I love, love, love the stuff because it cleans up with ammonia rather than mineral spirits and it leaves a super smooth finish for your next coat of paint.  Which I will be applying...

Manana!